Showing posts with label running shoe lacing. Show all posts

Sunday, November 16, 2014

Carrying Hydration During Exercise

Always carry water with you when you walk/run even if you are just going a short distance. Building good hydration habits early on will set you up for successful longer distances later. Walkers and runners should be able to drink water or sports drinks when needed during exercise. If you don't carry your own water, you can drink only when water happens to be available en route. The uncertainty and inconsistency of available water increases the risk of dehydration and overheating. Always wear a hydration belt/backpack or carry a hand-held bottle during training and during races. Experienced runners and walkers always carry their own hydration.

Carrying a water bottle in your hand is not the most comfortable way to carry water. It restricts your arm movements, creates a weight imbalance, and it is easy to drop a water bottle when your hands get sweaty and/or tired.  There are many convenient, comfortable and affordable solutions for carrying hydration during exercise.

HYDRATION BELTS
A hydration belt is the most popular hydration solution. They are priced about midway between a hand-held system and a backpack with lots of options and price points. Various configurations of hydration belt are available with a single bottle or multiple bottles. My personal preference is a belt that contains 2 bottles and has a roomy zipped pouch. I like the two bottle configuration as it gives the option of having water in one bottle and a sports drink in the other for longer distances. Some people prefer a 4 bottle system so they can distribute the weight more evenly around the body and others prefer one large bottle. Belts with plastic clip closures are more expensive but tend to be a better fit. The Velcro belts are cheaper and will do the job so if you are on a budget, a Velcro closure could be a good option. When you first wear a hydration belt it may feel strange and a little uncomfortable but you will get used to it very quickly and after a while you will not feel quite right without it! Our personal favorite and one we recommend to WalkAthletes is the Fitletic, iFitness Hydration belt (available from Fitletic, Amazon and some running stores). It is very comfortable belt and conveniently has the water bottles and pouch situated in the front (and, in case you are wondering, we have not been asked to recommend or review this product and we paid full retail price for the belts we use).

HAND-HELD HYDRATION
If you feel that a belt would be too restricting or uncomfortable a hand-held hydration system may be preferable. It consists of a hydration bottle that fits into a holder that is strapped onto your hand. It allows you to carry a bottle without having to grip it in your hand. Most hand-held hydration systems include a pocket for carrying essential items such as a phone, keys, and ID. it is a more economical solution than a belt or backpack and for shorter distances may be a great solution.

HYDRATION BACKPACK
A hydration back pack is the most expensive option but also enables you to carry more fluids. This can be useful if you are doing long miles and cannot refill during your walk/run. Some people prefer the backpack hydration system over a waist belt as they find it more comfortable.  The backpack hydration systems can make you feel hotter as it like adding an additional layer of clothing to your back but it is a personal choice. I would recommend that unless you are planning to do long miles that you start with a regular hydration belt and upgrade later if necessary. 

Whatever type of system you decide to purchase, select one with a zipped pocket (not a Velcro or button closure pocket) for security. Make sure that the zipped pouch is large enough for your phone, ID and keys.

Hydration systems are available from general sports stores, specialty running stores and online. You can find them in some big box and department stores too but remember that if it is really cheap, there is a probably a good reason. You usually get what you pay for!

CARING FOR YOUR HYDRATION BOTTLES

hydration bottle
You should wash your hydration belt bottles after every use. Wash them by hand in hot soapy water and make sure you remove and wash the tops well (use a brush to scrub them). If you don’t wash your bottles after each use mold and bacteria may start to grow on/in them and can make you sick. The same goes for hydration backpacks. The bladder must be removed and washed thoroughly after every use to keep it clean and free of bacteria and mold. Some brands can be washed on the top shelf of a dishwasher when you first buy them if they smell a bit “plasticy”. Check the manufacturers instructions to make sure it is safe to do so. Do not set the dishwasher to heated dry as the bottles will likely melt.


 

Friday, August 1, 2014

It's Never Too Late to Get to Know Your Feet


If you are athletically walking regularly for exercise, you are racking up a lot of mileage on your feet and your shoes every year! Taking care of athletic feet needs more than a nice pedicure every couple of weeks!  You need to make sure you are wearing the right type of shoes for your feet. This means you need to understand your arch type and your gait and how those correspond to the types of athletic shoes available.

FINDING YOUR ARCH TYPE
The first thing you need to determine is your arch type. There are three arch types.

1. Flat
2. Normal
3. High


You can find out what kind of arch you have by using an electronic arch pad found in running shoe stores and some sports stores like Sports Authority, or you can do the “wet test” at home. To do the wet test, you need two pieces of absorbent paper that are larger than your feet. Newspaper works well, or you can use a dark colored craft paper. Get a bowl (also larger than the size of your foot) and fill with 1-2” inches of water. Remove your shoes and socks. Dip one foot into the water so it wets the bottom of the entire foot and place the foot on one sheet of paper with your weight on the foot. Remove your foot by lifting it straight up and immediately take a photo of the image on the paper. Repeat with the other foot using the other piece of paper. Use the image above to determine your arch type. If you use an electronic pad, take a photo of the image of your feet so you can refer back to it later if necessary.
IMPORTANT: Don’t assume that you know what type of arch you have without verifying it. Many times people tell me what kind of arch they have and 8 times out of 10 they are wrong! If you wear the wrong shoe for your arch type you could be setting yourself up for all sorts of problems.
 

DETERMINING YOUR GAIT (PRONATION)
You also need to determine your gait. This can be done by having someone knowledgeable about gait watch you walk or run. You can also review the wear pattern on the bottom of your current shoes or bring them with you to the store so a shoe specialist can look at the wear pattern (ideally, you should do both). If the shoe store performs a gait analysis by having you run or walk on a treadmill so they can film you, do not let them bully you into doing it barefoot. The way you run or walk will be very different barefoot than it will wearing shoes. It is best to wear your current running/walking shoes for the treadmill analysis. If you do not have running shoes with you, then put on a pair of neutral running shoes at the store for the treadmill analysis. Then after you have selected a shoe, do the treadmill analysis again wearing the shoe you intend to buy to make sure it does cause problems with the way you run or walk.

A piece of advice - Don’t get freaked out if a shoe sales associate tells you that you pronate. EVERYBODY pronates. “Pronation” refers to how the foot rolls inwards to distribute your weight as it cycles through each step. This rolling inwards motion as the foot progresses from heel to toe is the way that the body naturally absorbs shock.

There are three types of pronation:

1. Neutral (or normal) pronation
2. Over-pronation
3. Under-pronation (Supination)


Neutral pronation
A neutral pronator initially strikes the ground on the lateral side (outside) of the heel. As the weight is transferred from the heel towards the midfoot, it will roll towards the medial side (inside), distributing weight evenly across the foot. At this stage the knee will generally, but not always, be positioned over the hallux (big toe). A neutral pronator has good shock absorption. The wear pattern on shoes will be fairly even across the bottom of the shoe. A neutral pronator will do well with a neutral or light stability shoe. People with normal arches most often, but not always, have neutral pronation.


Over-pronation
As with a neutral pronator, an over-pronator initially strikes the ground on the lateral side (outside) of the heel. As weight is transferred from the heel to the midfoot, however, the foot will roll too far to the medial side (inside), such that the weight is distributed unevenly across the foot, with excessive weight borne on the hallux (big toe). In this stage, the knee will generally, but not always, tracks inwards. An over-pronator does not absorb shock efficiently. The wear pattern will show more wear on the medial side of the shoe towards the big toe. An over-pronator requires a shoe with good medial support to prevent the foot rolling too far inwards. Wearing the wrong type of shoes can exacerbate ankle and knee problems. People with flat arches are often, but not always, over-pronators. 


Under-pronation (also called Supination)
An under-pronator, or supinator, also initially strikes the ground on the lateral side (outside) of the heel. As weight is transferred from the heel to the midfoot, the foot will not roll far enough in a medial direction. The weight is distributed unevenly across the foot, with excessive weight borne on the little (pinky) toe. In this stage, the knee will generally, but not always, track to the outside. An under-pronator does not absorb shock efficiently. The wear pattern will show more wear on the lateral side of the shoe towards the rear of the shoe in the heel area. An under-pronator requires a neutral, cushioned shoe and should never wear any shoe with motion control. People with high arches often, but not always, under-pronate.


You are now more knowledgeable about your feet than 80%+ of the population. This will give you a huge advantage when discussing your athletic shoe needs with sales associates.

It is never too late to get to know your feet! 

Saturday, December 7, 2013

Lacing Techniques for a Perfect Shoe Fit

If you are wearing the correct type and size of running shoe but are not 100% happy with how the shoe fits or feels, you may benefit from a different lacing technique. Changing the way you lace your shoes can fix niggling shoe problems and transform an "OK" shoe into an "excellent" one!

Here are a 5 common shoe problems and the lacing techniques that can help alleviate them.

1. HEEL SLIPPING (USING BUNNY EARS)
Problem: The shoe feels loose around my heel causing my foot to slip up and down in the shoe. If I tighten the laces to keep the shoe on, the laces feel too tight and hurt my feet.

Cause: If you have narrow feet you may find it hard to find a narrow enough shoe. Men with narrow feet often find that wearing women’s running shoes can solve the problem. If you like a shoe with a wide toe box you may find that your toes feel great but you have too much room at the ankle.

Solution: Create a more secure fit around the ankle without tightening the laces on the entire shoe. You can achieve this with Bunny Ear Lacing.

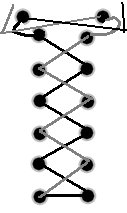
Technique: Lace your shoes as you normally do (using regular criss cross lacing or a using a custom lacing technique). When you get to the top eyelet thread the lace straight up on the outside of the shoe and bring it through the last eyelet leaving a loop.. Do the same on the other side. Thread the opposite lace through the loop (on both sides) and pull the laces to tighten them. If the shoes feel too constricting using the 7th eyelet that is set off to the side (as pictured), use eyelets in rows 5 and 6 instead. Alternatively, you can create the loop by threading the lace back through the same hole on eyelet row 6 and then threading the opposite lace through the loop. This will enable you to tighten the laces at the ankle but not tighten the laces lower on the shoe.


2. HOTSPOT ON TOP OF FOOT
Problem: My shoe rubs one spot on the top of my foot. It may only be a problem on one foot. It may feel like the lace is too tight but just in that one spot.

Cause: The shape of your foot or arch can cause a hotspot on top of one or both feet. It may happen in all running shoes or just in a specific pair of shoes that otherwise are great running shoes.

Solution: Eliminate the pressure on the hot spot by lacing around it.

Technique: Lace your shoe as you normally would until you reach the eyelet before the area that is experiencing discomfort. Thread the lace through the eyelet above it on the same side. Do the same on the other side. Continue lacing as usual. If the problem is only on one foot then you only need to change the lacing on that foot. It is OK to have both shoes laced differently.


3. HAMMER TOES OR BLACK BIG TOE NAILS
Problems: I have hammer toes OR  I keep getting black toes nails on my big toe.

Cause: Hammer toes have various causes but shoes that push down on the top of the toe can make the toes curl under more. Black toe nails are not always avoidable. Running or walking long distances is an endurance activity and will put a lot of pressure on your feet so some toenail problems are to be expected.  

Solution: Take as much pressure off the toes as possible. Lift up toe box to prevent toes curling under. Ease the pressure of the shoe pushing down on the big toe.

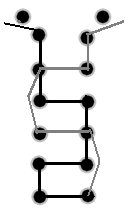
Technique: Thread one end of the lace through the first eyelet on the same side as your big toe. Thread the other end of the lace up through the last eyelet on the opposite side. Leave enough shoelace here to be able to tie your shoes into a bow.  Take the other end of the shoelace at the bottom of the shoe and thread it back and forth through the eyelets to the top. When you tug on the outside lace, it will pull the material above your big toe up and off your nail.


4. TOO TIGHT ON TOP OF FOOT (USING PARALLEL LACING)
Problem: My shoe feels too tight along the top of my foot but if I loosen them, the shoe is too loose.

Cause: This problem is often caused by high arches. The laces feel too tight along the top of the foot, but loosening them makes the shoe too loose.

Solution: Use parallel lacing instead of criss-cross lacing to take the pressure off the top of the foot while allowing the shoes to be tightened securely.

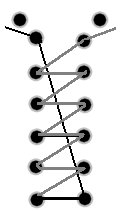
Technique: Put the lace through the eyelets on the first row. On the big toe side of the shoe thread the lace through the eyelet above it on the same side. Then thread it through the eyelet on the opposite side (going straight across). Thread the lace through the eyelet two rows above it and then straight across to the opposite side. Then two rows above it on the same side. Repeat on the opposite side starting with threading the lace through the eyelet two rows above on the same side.Tie shoes as normal.

 
5. CRAMPED TOES  (USING DOUBLE LACES)
Problem: My toes feel cramped but if I loosen my shoes, the toes feel OK but the top part of the shoe is too loose. I have bunions and my shoes always feel tight across the toebox.

Cause: The may be caused by a foot that is wide across the toes but narrow towards the ankle. This can also be caused by bunions or callouses on the foot.

Solution: Reduce constriction in the toebox are by using two shoelaces on each shoe instead of one.

Technique: Remove the laces and measure them. Buy two sets (four laces) approximately half the length of the original laces. On each shoe, use one lace for the bottom three eyelets and another lace for the upper three eyelets. You will have two bows on each shoe – one half way up the shoe and the other at the top where you normally lace your shoe.  This will enable you to tie the bottom laces looser without affecting the tightness of the top part of the shoe.


Sunday, June 2, 2013

Choosing the Right Athletic Walking Shoes

If you are not wearing the right shoes, or are wearing shoes that are old and worn out, you are likely to experience problems and injuries. Make sure you visit a specialist running shoe store to purchase your athletic walking shoes. Buying shoes online or at a discount shoe store is OK if you have been fitted for the right shoes and know exactly what you need. Buying shoes online at random, because you like the color or the price, or because one of your friends recommended them is a sure way to create problems for yourself! Shoes that work for someone else will not necessarily work for you. Your feet need a shoe designed for your exact foot type not for someone else's feet.

Athletic walkers should wear running shoes not walking shoes. Walking shoes are heavy and designed for hiking not for athletic walking. You need a lightweight shoe so a running shoe is perfect. Make sure it is flexible at the places where your foot needs to flex (at the toes for example). If the shoe is rigid where your toes bend, you will not be able to push off properly. This is less important for runners than it is for walkers.

Some running shoe stores will offer a diagnostic service to determine which type of shoe you should wear. Sometimes the store will film you running on a treadmill  – either wearing shoes or barefoot. Alternatively, they may watch you walk or run and use their personal experience to determine the best type of shoe for you. Although some of the  diagnostics may seem very technical and complicated, they are not always accurate. Some stores use these diagnostics to confuse or scare you and upsell you to the most expensive shoes, inserts, socks and any other accessories they think they can convince you to buy! Bear in mind that the people conducting these “tests” are not doctors, exercise physiologists, physical therapists or experts in biomechanics. They are shop assistants/sales associates and they have probably received 30 minutes or so training on the equipment and a lot more training on how to sell you lots of stuff! Even if the sales associate has the best intentions, he or she is not a qualified practitioner and may not be giving you the best advice.

There are many reputable running stores with very knowledgeable staff. However, you must keep in mind that they are helping you select shoes based on their knowledge of shoes, not on their knowledge of your feet. Your feet are unique to you so you cannot expect a salesperson to understand them in quite the same way that you do. If you know all about your own feet, you can work more effectively with a running shoe salesperson to select the best shoes to fit them. Be sure to share as much information as you can about your feet and your shoe-wearing experiences. For example, if you often get blisters or aches and  pains in your feet or toes, share this information. If you roll your ankles often this is an indicator of how much stability would be appropriate in a shoe. The shoe salesperson cannot glean this type of information just from looking at your feet or shoes. Your input is invaluable. To learn more about your feet, this link will take you to my post about getting to know your know feet.


If the sales associate works on commission he or she will have a huge incentive to sell you the most expensive pair of shoes in the store. So, bear this in mind while being dazzled with lots of tech speak about pronation, supination and heel-toe drop!

I highly recommend that you visit a specialty running store to buy shoes especially if it is your first time being fitted for proper long distance walking/running shoes.  A chain store or generic sports store will not have specialized athletic shoe personnel available. They will not let you wear the shoes to test them out properly in the parking lot; neither will they give you a month or more to try them out and then let you bring them back and exchange them if you decide you don't like them. Specialty running stores have higher priced shoes but you will get much more personalized service. They are committed to getting you into the best possible shoe for you and it is not always possible to determine what that shoe will be without you walking a few miles in them over 2-4 weeks!


SHOE SIZE
NEVER, EVER buy running shoes in your normal shoe size! No one cares what size shoes you wear. Don’t buy smaller shoes because you want your feet to look smaller or you are concerned about being a bigger size. That type of vanity will result in discomfort and injuries (and money wasted on shoes that you will end up having to replace long before they are at the end of their useful lives).

Your running shoe should be 1 to 1.5 sizes LARGER than your normal shoe size. You need at least a thumbs width of space between your longest toe and the end of the shoe (measured on your largest foot when you are standing up wearing the shoe). If you wear shoes smaller than this, your feet will not be able to move in the shoe properly. This will decrease shock absorption. Your feet will naturally swell as you walk or run long distances. You need enough room in the shoe to allow for this and to make sure your toes are not cramped. Wearing shoes that are not large enough can result in excessive swelling, numbness, blisters, bruised (or lost) toenails, and general fatigue in your feet. Right-sized and right-fitted shoes will enable you to build endurance and speed. The wrong shoes will not. Experienced walkers and runners always buys their shoes the right size (1 – 1.5 sizes larger than their normal size). Rookies will often buy shoes too small. This may be because they don’t know about needing a larger size for running and walking. Sometimes the sales associate may not tell them they need a larger size. Other times the rookie is advised they need a larger size but they refuse to believe it and insist on buying shoes too small. The millions of runners and walkers around the world know what they are talking about. If you listen to those with more experience, you will make fewer mistakes and end up with fewer injuries!

HOW LONG SHOULD MY SHOES LAST?

Running shoes will last for approximately 400 miles. Some shoes will last for only 200 miles and others for 600 miles. Heavier folks usually wear shoes out faster than lighter ones. Walkers usually wear shoes out faster than runners. If you start to get aches and pains or fatigue in your legs or hips that are unusual, it is very likely because your shoes need replacing. Keep track of the mileage on your shoes. When you get to 400 miles, if you have not replaced them yet, you should really be thinking about doing so. I highly recommend using a software program to keep track of your running/walking miles. An excellent free software program is Sport Tracks. You can sync a GPS watches with the program or enter your mileage manually. You can also import data from other programs. Enter your shoes into the program, keep track of each walk and it will calculate the current mileage on them. I like this program so much I upgraded to the paid version. It is much more convenient than trying to keep track of shoe mileage in a spreadsheet!

MOST IMPORTANT - Only wear your athletic walking or running shoes when you are athletically walking or running. They are not everyday shoes. They should be worn just for your workouts. When you buy new running shoes, you can repurpose your old ones as everyday “going to the store” or “working in the garden” shoes.